
Swatches on knitting board


On the boardknitting group we are doing swatches in different stitches right now. This is an effort on our part to learn new stitches and broaden the choices we have for a loom knitted piece.
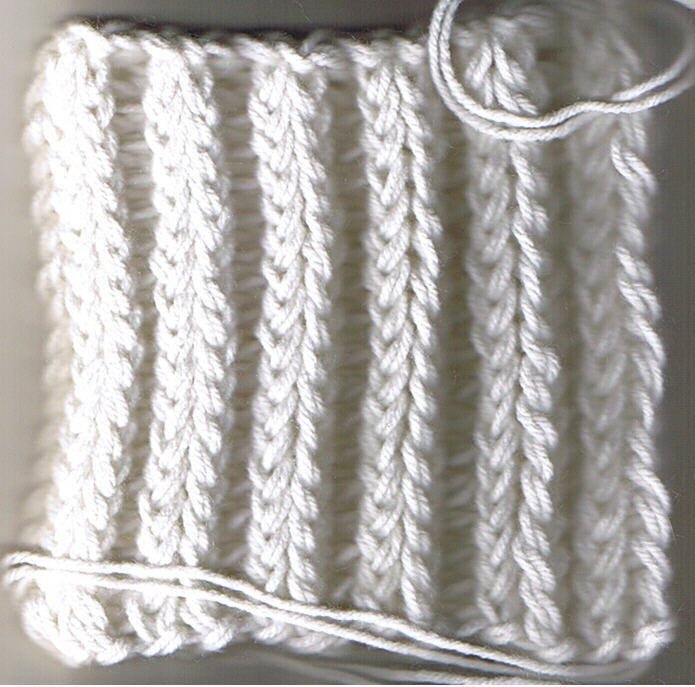
The top two pictures are both sides of a swatch that is done on a CinDWood Crafts scarf loom, 5/8" gauge with a double strand of worsted weight yarn using the Ewrapped Rib stitch. I display both sides because as you can see these are not alike at all. I did not follow exactly the instructions as posted as I had trouble with one side of the project getting too tight with my first (bottom Picture) swatch which is a regular rib wrap.
Now the instructions I had for both of the rib wraps have you starting your rib after your cast on row starting at peg two. As I said this didn't work well for me for the first swatch I started so I switched to starting my wrap with peg one instead of peg two. So for the bottom swatch you are doing the following:
I used the long tail cast on over 12 top and bottom or total of 24 pegs ending on peg 12 top row.
Pattern Start:
Ewrap peg 1 top row, this should be the peg you ended your last row with.
Ewrap peg 3 bottom row
Ewrap peg 3 top row
Ewrap peg 5 bottom row
Ewrap peg 5 top row (see the process, it is a slanted stockinette but in e-wraps)
Continue across skipping every other peg, (do not turn the board to wrap the second half)
Going back in the other direction Ewrap all skipped pegs, you should end on the bottom peg 1 NOTE: Remember that in wrapping in the opposite sides of the board with an e-wrap you must wrap in the opposite direction. As long as you make sure the yarn crosses iteself to the inside of the loom between the two rows of pegs you will be doing it right. (crossed yarn should not be to the outside of the pegs)
Knit off
Do not turn the board. Wrap from one side facing you for all rows. Not turning the board helps keep you in line for the next row. Continue your wrap following the same above starting with the first peg on the top row and continuing in pattern.
I worked 18 rows for this swatch (was suppose to be 19 but I miscounted, oops)
Cast off in cast off of your choice.
TIP: When knitting off your stitches start your knit offs on the ends of the board. Knit off pegs 1 & 2 top and bottom for both sides. This will help keep the stitches more even looking and help prevent a loopy stitch on one side while the other side has a tighter stitch.
This swatch creats the two different sides that you see in those two pictures for the Ewrapped Rib stitch. One side has the valley's between two sets of knits but those knit stitches are very close together, the bottom row side. The other side has deeper wider valley's between the sets of knitted stitches, the top row side. This type of rib wrap would make a nice cuff for sweaters as it is very flat on one side and has the nice ribbing on the other. I know it sounds complex but it really is quite easy and a very lovely looking wrap.
If you choose to do the wrapping starting at the bottom peg across from where you ended your cast on then the look of the piece will be the same on both sides of the piece. (will post a picture of this type of swatch later)
For the bottom rib wrap stitch swatch, this is illustrated at: http://www.knittingboard.com Look for the rib stitch in their section of knitted stitches. If you have trouble with this one let me know and I will try to explain it a bit differently. They do have a nice drawing to help you learn this one.
Next I am going to be working Bety's waffle stitch instructions. I just need to re-write this so I can see better what I am doing first. Then after that one I think the knittingboard.com criss cross, zig-zag, cable, and open ribbing need a swatch done for my file I am starting on these. Oh I might as well do the single stitch (slanted and non slanted, figure eight and stockinette to add also, somehow I lost my old swatches in these, besides that has been a while. I need to start over.) Then there are some lace swatches I should get around to doing again for my records and the stitches I just learned for K2P2 and K2P1. Swatches are so neat for showing you what something looks like without putting too much work into them.
Labels: Loom Knitting
posted by Amoonsinger at 11:01 AM
![]()
![]()


0 Comments:
Post a Comment
<< Home