Saturday, April 29, 2006

Your Brains Pattern

Your Brain's Pattern

You have a dreamy mind, full of fancy and fantasy.
You have the ability to stay forever entertained with your thoughts.
People may say you're hard to read, but that's because you're so internally focused.
But when you do share what you're thinking, people are impressed with your imagination.


I found this through a group I joined and had to check it out. Wow, I do believe they have me pegged. They sure hooked me into continuing when I first read about what this was, but I wasn't a bit needled by the answer I got. LOL

Labels:

Tuesday, April 25, 2006


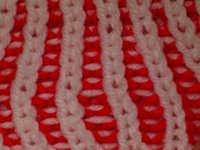
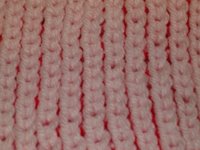
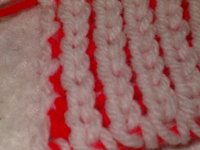
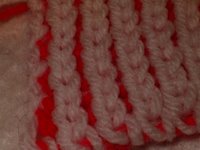
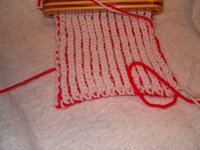
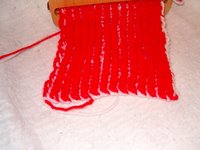
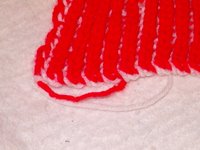
These are some pictures of what I have been playing with. So far I am not at all happy with the sides of the swatches. I have tried several different methods of making the stitches on the ends and all of them fail, some much worse then others but still failures. I will keep trying.

If you look at some of the pictures that show the sides well you will see just what I am talking about. This swatch really has several different types of ways to wrap the ends and it is almost always the same thing, pull distorted stitches on the sides. Now this is only on one side of the red and one side of the white. The stitches on the opposite side are fine all the way up the piece.

Last night I just sat and worked on one of these swatches. Wow, I frogged that thing more then I care to count. I got to the point of wanting to throw the whole thing in the garbarge, but restrained myself through sheer will power and getting up to walk away, a lot. I am not only still trying to make the sides look better, I decided I needed to try different stitches to make this as well. Oh and I changed the colors I am using. Actually I only changed the red to blue. It is so much easier to see.

It may be that in the long run I will have to do a crocheted edge to pretty up those sides but I am, if nothing else, stuborn and have not given up yet. Right now I am running on the "I think I Can" and refuse to give it up.

Oh I know you cannot see much of it but that is a little board from DA. It is one with wood pegs. This little one has been handy for playing more then once. It is so light weight that holding it is like almost having nothing in your hands. I can also use one strand of worsted to do my playing and not be bothered by extra strands while playing. I do like that.

All in all, I am not a designer. Can you tell. I much prefer to have it done by someone else for my knitting pleasure, but this one has grabbed a hold of me and won't let go. So no matter if someone else comes up with something, I have to do this, even if it should take me the rest of the year to get it. LOL


Saturday, April 22, 2006

Elongated Stitch Hat


This is just a little hat done from a stitch in the book Knitting Wheel Fashions. Beyond this stitch there was nothing in the book worth my having purchased it. Oh well, sometimes we win sometimes we loose. This book would be for the beginner beginner. The total novice to looming would have a ball with it. I believe that I have advanced a bit beyond the scope of this one. For the most part there are free patterns available though sites on the web and in groups that make the pieces in this book extremely basic patterns.

This stitch though has possiblilites. I didn't follow the pattern in the book, changed yarn, did my own thing in rows, and didn't add as many strands of yarn as the pattern calls for because I really wanted to see what the stitch was going to be like.

So here it is.

I am now trying one in a plain white yarn adding a strand of red fun fur for the cuffed brim and two strands of the fun fur for the body. Oh I did do their cast off which is the one in groups that has been going around for quite awhile. You know the one where you decrease around the loom before the gather. I have tried this before and I like it just as little now as I did the first time I tried it.

Labels:

Fisherman Crochet


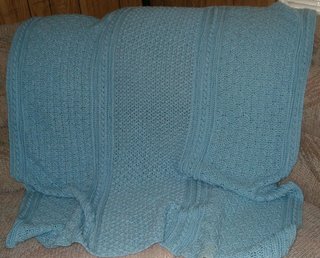
This has got to be the hardest piece I ever did. Not that the piece itself is hard, but I was having hand problems, actually my wrists, and this pattern has so many different types of stitches to create the fisherman look. This one is one of my favorite pieces that I have done though.

My DIL still has this, well she has all the pieces that I have done for her and the babies. With this one I did a hat, a bunting and a pair of booties. She could not find the bunting for me to take a picture of. It was still packed away from when they moved.

A lot of work did go into this piece but I love how it turned out.

Friday, April 21, 2006


Here are some examples of things that can be done to hats depending on how you work the colors. The red and black hats are done on round looms working in the round. One is showing bands of color, alternating the colors and a wide strip of color along with a narrow. The other red and black is a spiral pattern.

Now the blue and black hat shows what happens to the stitches when you work the flat method of ewraps on a straight rake. See how the colors from one row slant differently then the next row. Kind of neat huh.

Weaved Table Top


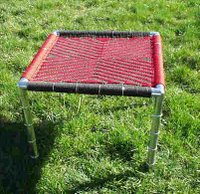
Sometimes I like to do a little something different. I found this frame for a table at a second hand store several years ago. When I first saw it I just passed it by. It is one (was) one of those tables that had a glass top but the glass was gone. A note on the frame said the glass broke.

As I walked around the store the table kept coming back into my mind. It just wouldn't leave. The thought was that maybe I could do the chair braiding technique on this frame. So I bought the frame and home it came. I looked through all my pattern books but just could not find what I wanted for the top of this table. So I got some graphing paper and made my own pattern.

The frame had been sitting around for a while so was quite tarnished. Cleaning it was quite a lot of work since the legs and top is not straight but has lots of bends for accent. It took days of polishing and buffing to get it to shine right again, and a lot of back pain from all the bending, but it was completed.

The design is a very tight weaved top for the table. I didn't want a chance that the top would be able to sag at any time so it is tightly packed as it is weaved. The only problem with that was for the last few rows. There was little room to work and I had to make up special pulling tools for the weaving but I finally finished it.

I have had this as an outdoor table for summer use for years now. This past year the table legs started to show the wear and the metal that is on them is simply a layer of shiny stuff over a base that is not all that nice. This year if I am going to continue to be able to use it and have it look nice I am going to have to find a way to replace the legs. It would be a bummer to loose it. The good news is that if I do, I have another frame, a bit more of the rectangle then square, to replace it with. The bad news is that I need another pattern and I am not looking forward to the back pain, I am a few years older also.

Still this table is a good example for those who are into recycling materials. You can discover ways to makeover something if you just let those thoughts in your head have their way.

Saturday, April 15, 2006

Swatches on knitting board


On the boardknitting group we are doing swatches in different stitches right now. This is an effort on our part to learn new stitches and broaden the choices we have for a loom knitted piece.

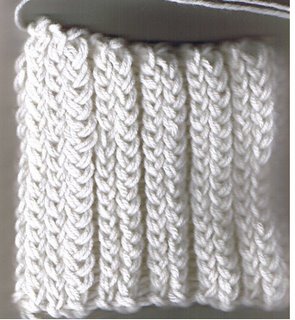
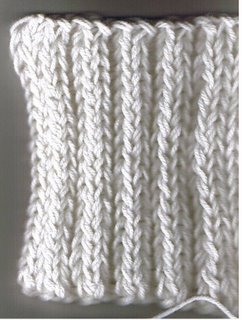
The top two pictures are both sides of a swatch that is done on a CinDWood Crafts scarf loom, 5/8" gauge with a double strand of worsted weight yarn using the Ewrapped Rib stitch. I display both sides because as you can see these are not alike at all. I did not follow exactly the instructions as posted as I had trouble with one side of the project getting too tight with my first (bottom Picture) swatch which is a regular rib wrap.

Now the instructions I had for both of the rib wraps have you starting your rib after your cast on row starting at peg two. As I said this didn't work well for me for the first swatch I started so I switched to starting my wrap with peg one instead of peg two. So for the bottom swatch you are doing the following:


I used the long tail cast on over 12 top and bottom or total of 24 pegs ending on peg 12 top row.
Pattern Start:
Ewrap peg 1 top row, this should be the peg you ended your last row with.
Ewrap peg 3 bottom row
Ewrap peg 3 top row
Ewrap peg 5 bottom row
Ewrap peg 5 top row (see the process, it is a slanted stockinette but in e-wraps)
Continue across skipping every other peg, (do not turn the board to wrap the second half)
Going back in the other direction Ewrap all skipped pegs, you should end on the bottom peg 1 NOTE: Remember that in wrapping in the opposite sides of the board with an e-wrap you must wrap in the opposite direction. As long as you make sure the yarn crosses iteself to the inside of the loom between the two rows of pegs you will be doing it right. (crossed yarn should not be to the outside of the pegs)
Knit off

Do not turn the board. Wrap from one side facing you for all rows. Not turning the board helps keep you in line for the next row. Continue your wrap following the same above starting with the first peg on the top row and continuing in pattern.
I worked 18 rows for this swatch (was suppose to be 19 but I miscounted, oops)
Cast off in cast off of your choice.

TIP: When knitting off your stitches start your knit offs on the ends of the board. Knit off pegs 1 & 2 top and bottom for both sides. This will help keep the stitches more even looking and help prevent a loopy stitch on one side while the other side has a tighter stitch.

This swatch creats the two different sides that you see in those two pictures for the Ewrapped Rib stitch. One side has the valley's between two sets of knits but those knit stitches are very close together, the bottom row side. The other side has deeper wider valley's between the sets of knitted stitches, the top row side. This type of rib wrap would make a nice cuff for sweaters as it is very flat on one side and has the nice ribbing on the other. I know it sounds complex but it really is quite easy and a very lovely looking wrap.

If you choose to do the wrapping starting at the bottom peg across from where you ended your cast on then the look of the piece will be the same on both sides of the piece. (will post a picture of this type of swatch later)

For the bottom rib wrap stitch swatch, this is illustrated at: http://www.knittingboard.com Look for the rib stitch in their section of knitted stitches. If you have trouble with this one let me know and I will try to explain it a bit differently. They do have a nice drawing to help you learn this one.

Next I am going to be working Bety's waffle stitch instructions. I just need to re-write this so I can see better what I am doing first. Then after that one I think the knittingboard.com criss cross, zig-zag, cable, and open ribbing need a swatch done for my file I am starting on these. Oh I might as well do the single stitch (slanted and non slanted, figure eight and stockinette to add also, somehow I lost my old swatches in these, besides that has been a while. I need to start over.) Then there are some lace swatches I should get around to doing again for my records and the stitches I just learned for K2P2 and K2P1. Swatches are so neat for showing you what something looks like without putting too much work into them.

Labels:

Monday, April 10, 2006

Furry striped hat and matching fur scarf


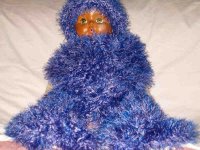
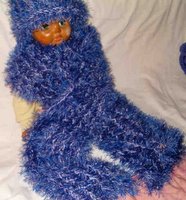
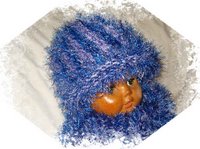
Here is the scarf and hat I recently did for an exchange in knitting. I know that is a doll wearing the hat and scarf but she is not as small as you might think. She is a rather large doll and that hat is made for an adult. See the pictures of her wearing the scarf, it is wrapped around in the pictures and covers her way beyond the bottoms of her feet. I made this scarf very long.

The scarf was doing holding a strand of Bernat baby soft lilac, a strand of fun fur dark blue, and a strand of fun fur lilac. I used a CinDWood scarf loom wrapping every other peg in a figure eight. You can make this one thinner to fit nicely around the neck or it stretches so that you can also wrap the head and have it covered nicely.

The hat was done in stripes. I use one strand of Bernat baby soft lilac with one strand of the fun fur blue and fun fur lilac for the rolled brim. The I added an additional strand of the Bernat baby soft and wrap the stripes with a strand of Bernat plus a strand of dark blue fun fur for one stripe, then a strand of Bernat plus a strand of lilac fun fur. The loom was a 1/2" gauged round adult hat loom from CinDWood Crafts. (see side bar for link to Cindys site, but a note from Wednesday April 12th until Wednesday April 19th Cindy and family will be on vacation and so not available for sales) I wrapped two pegs, with one color set, then the skipped pegs with the second color set, with a simple 1/1 wrap and knit off. No need to get fancy with fun fur, you don't see the stitches anyway.

So the set is off to it's new home and should be arriving soon. It is so soft and comfortable. I should make a set for myself for this next winter (only I think red and black with a burgendy background, oh sounds nice, ah need extra time, anyone know of a website selling such)

Labels:

Sunday, April 02, 2006

Tatting


I love the tatting that is ladies and creatures. Here you see a bird that is from Tatted Animals by Inga Madsen. I looked for the picture of the cat I did from this same book but it is not on this computer. I will have to search my other computer to see if it is still there. I also have an elephant in the works from that same book. There are many very nice patterns in Inga's book.

The Seahorse is one of the free patterns from Jane Eborall's website. Oh she has many wonderful patterns and making more all the time.

Sometimes it is a little difficult following written patterns, but for those who really have a hard time, Inga's book is all diagrams that are easy to follow, but there is little written for the pattern. So the need to be able to follow a diagram is great.

Now the seahorse is Jane's medium one. She does have a pattern for a larger seahorse on her site: http://www.e.n.e.btinternet.co.uk/index.htm . She has written instructions along with diagrams for many things. I know there is a diagram for the medium and large seahorses, but I don't think all her patterns do have the diagrams. What do you want, she places them on the net for free, and that is just wonderful. She also has a varity of things to choose from. So check her out if you are a tatter and have not been there.

Saturday, April 01, 2006

Hooded scarf


I haven't updated this in a few days. I have been so busy that I just haven't had the time. Work and family have occupied my time.

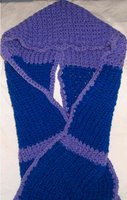
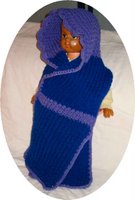
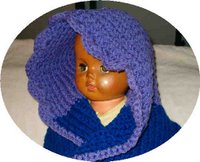
Here you see pictures of my lastest done loom knitted hooded scarf combo. I did this one on a large gauged CinDWood scarf board. When ever I decide to do another of these I will make some changes. I would like the scarf portion a little longer and a bit more narrow then what I made this one. This was only meant to lay in the front across the chest, not to wrap around.

Board loom large gauge, 18 pegs per side (36 pegs total to the board)
Double strand of worsted weight yarn
I needed 4 8oz skeins, two of each color, main color=MC, contrasting color=CC
Pick of your choice
Figure eight and single stitch wraps
Long tail cast on
Crochet removal every peg.
Working yarn is the yarn coming from the skein

Using the long tail cast on and MC, cast on to all pegs
Edge:
Using figure eight wrap and knit off 4 rows
Body plus side edge:
*Figure eight wrap the first 2 peg sets (top two, bottom two pegs)
Wrap across the loom using the single stitch (amishlooms stitch) (DA's zig-zag stitch) till you get to the last four pegs, two top and two bottom.
Figure eight wrap the last two sets, top 2 bottom 2 pegs.*
Work the same as between ** for 30 more rows, cut MC and attach CC.

Change yarn to second color:
Stripe:
Work five rows for stripe as follows:
Work row one in ** pattern
Work row two all figure eight
Work row three in ** pattern
Work row four in all figure eight
Work row five in ** pattern, cut CC and attach MC.

Body continued:
Work in ** pattern for 31 rows, cut MC and attach CC.

Hat portion:
Work hat portion for 31 rows following in same stitch pattern, cut CC, tie on MC


Reverse the order of what you have just done.

Once you have finished the second side border rows remove as follows:
Start on the opposite end of the board from where your working yarn is and on the opposite side, pick up the stitch from the first peg with your crochet hook. Pick up the first stitch from the opposite row. Example: If you are starting your pickup from the bottom row, you would next pick up the stitch from the first peg top row. Now pull this second stitch through the first one.

Go to the number two stitch on the row you started with, pick it up and pull it through. Continue moving from bottom to top, or top to bottom, depending on where you started, picking up stitches and pulling them through. When you get the last stitch pulled through cut and pull the end through to finish off.

Using the same color of yarn cut a long strand to sew up the back portion of the hat. Start at the bottom about an inch into the hood portion, leaving a long strand for hiding and extra sewing if needed. When I did this I left a portion of the hood color that is not sewed. It leaves about an inch to sit at the base of the neck.

Now attach CC to the bottom edge at the back of the scarf with the right side facing you and single crochet evenly around the scarf doing a shell stitch around the hooded part. I used a 5 double crochet shell, but you can use any type of shell or other stitch you would like.

Labels: